So Much Noise, So Little Time
One of the nice things about the Web has always been the diverse mix of people on it. In the relative anonymity of the Web, artists and sculptors hang out side-by-side with lawyers, accountants and CEOs, each with their own particular brand of views and opinions (which they’re usually only too happy to express, to anyone who cares to listen!)
This multi-layered mix of opinions and feedback makes today’s Web the modern equivalent of the Tower of Babel. It’s also one of the most important reasons for its popularity - very few other places have the same level of energy, the same sense of refreshment, and the same feeling of excitement every time you visit.
Given this highly-interactive nature of the beast, it’s no surprise that Web sites are also gradually becoming more and more accepting (and responsive) to user feedback. And, for a very long time, the simplest and most efficient way of capturing this user feedback has been via a so-called electronic “guestbook”, which allowed visitors to a Web site to record impressions about their visit and provide suggestions for improvement.
A guestbook is also one of the best ways to transform a Web site from a one-way channel of communication - from publisher to reader - into a more interactive two-way street, where users can provide comments on the content or features of the site, and the site managers can respond with opinions, corrections or enhancements. This immediately has benefits for both parties involved - a better user experience for the site’s visitors, and feedback from the horse’s mouth for the site managers.
Now, adding a guestbook to your site is pretty easy. Most often, your Web hosting provider will offer you a guestbook as part of your hosting package. In case you don’t get it bundled in your contract, you can buy one from the numerous service providers out there, or even sit down and program one yourself.
If you picked the last option (either by necessity or simply because you’re bored), then you’re going to be glad you found this article. Over the next few pages, I’m going to be discussing how to integrate a free, open-source PHP class named patGuestbook into your Web site, so as to rapidly, efficiently and cost-effectively add guestbook capabilities to your Web presence.
The upside? You’ll finally know what your visitors really think. The downside? The truth might hurt…
Flip the page if you’re ready.
Introductions
patGuestbook is a PHP-based application described, in the author’s words, as “a versatile guestbook with a wealth of configuration options”. Developed by Stephan Schmidt, it is freely available for download and is packaged as a single PHP class which can be easily included in your application.
Some of patGuestbook’s more interesting features include quick installation and configuration, easy integration into any Web site, multiple guestbooks, easy administration of guestbook entries, automatic email notification of new guestbook entries…the list goes on. If you’re the fiddly type who likes to play with advanced settings, the program comes with lots of those, too - ratings, customization of the interface using skins, moderator mode for guestbook entries, and support for so-called patExtras.
Written as a PHP class, patGuestbook can easily be integrated into any PHP-based Web site, and can substantially reduce the amount of time you spend coding guestbooks. You’ll find it functional, powerful and (if you’re the kind who likes fiddling) easy to customize, and it’ll soon be a standard component of every Web site you develop.
Before proceeding further, you should visit the patGuestbook home page at http://www.php-tools.de/ and download a copy of the latest version. The package contains the main class file, documentation outlining how to use it, and some example scripts.
Home Sweet Home
Since it’s a PHP script, patGuestbook needs to live somewhere under your PHP-aware Web server’s document root - typically, somewhere in the directory structure holding the rest of your Web site. For purposes of this tutorial, I shall assume that the application is located in the “patGuestbook” directory under the Web server root, and is accessible at the URL http://localhost/patGuestbook/
When you uncompress the source archive, you should see a directory structure that looks something like this:
patGuestbook
|
|
| --- admin
| --- config
| --- skins
| --- include
| --- sql
Once you’ve got the files in an appropriate location, you also need to create some database tables to store patGuestbook data (if you’re already using a database for your site, simply add patGuestbook’s tables to that database). Look in the source archive’s “sql” directory, where you’ll find an SQL script to create two tables - “patgbguestbooks”, which holds the master list of all the active guestbooks, and “patgbentries”, which stores the actual guestbook entries.
Here’s a quick glance at the SQL commands to create these tables:
DROP TABLE IF EXISTS patGbEntries;
CREATE TABLE patGbEntries (
  id int(10) unsigned NOT NULL auto_increment,
  guestbook int(10) unsigned NOT NULL default '0',
  date datetime NOT NULL default '0000-00-00 00:00:00',
  name varchar(100) default NULL,
  email varchar(200) default NULL,
  homepage varchar(200) default NULL,
  entry text NOT NULL,
  comment text,
  ratings text,
  flags set('approved') default NULL,
  PRIMARY KEY  (id),
  KEY guestbook (guestbook),
  KEY flags (flags)
) TYPE=MyISAM;

# --------------------------------------------------------

DROP TABLE IF EXISTS patGbGuestbooks;
CREATE TABLE patGbGuestbooks (
  id int(10) unsigned NOT NULL auto_increment,
  name varchar(20) NOT NULL default '',
  template varchar(255) NOT NULL default '',
  owner varchar(255) default NULL,
  entriespp tinyint(3) unsigned NOT NULL default '0',
  flags set('moderated','disabled','notify') NOT NULL default '',
  fieldconf text,
  PRIMARY KEY  (id),
  UNIQUE KEY name (name)
) TYPE=MyISAM;
Next up, configuration. patGuestbook configuration is handled via a single file named “patGuestbook.php”, located in the source distribution’s “config” directory. It’s fairly self-explanatory, take a look:
<?php
/**
*	patGuestbook Config
*/

// Database configuration
$db_host			=	"localhost";
$db_name			=	"patGuestbook";
$db_user			=	"me";
$db_pass			=	"secret";

// Directory where the templates for subscription pages are stored
$skins_dir			=	"skins";
// Directory where the templates for the administration are stored
$admin_template_dir	=	"templates";
?>
Most of this is pretty standard information - patGuestbook needs to know the database access parameters so that it can get to its tables, and the location of the directories containing screen templates for the guestbook administration module and the guestbook itself (these templates are used by the patTemplate engine to render each page of the application, and can be customized to your needs - more on this later).
If you’re using the default installation, you shouldn’t need to change any of the information in this file, except the database access parameters. If, on the other hand, you’re not using the default installation paths and are plan to integrate patGuestbook into your existing site structure, you should also alter the directory locations in the configuration file to reflect where the templates are located.
You can now check to see if patGuestbook is up and running, by visiting the URL (remember to alter this as per the installation path on your system) http://localhost/patGuestbook/example.php
patGuestbook should load up and display the following error message:
Could not identify guest book!
No need to panic - this is just an indication that the application could not find any guestbook in the system. This is probably because you have not yet created one - but hey, at least it confirms that you’ve got my configuration right.
Next, how about wiping out that error message by actually creating a guestbook?
The Voice Of The People
patGuestbook come with a comprehensive administration module to manage the application, accessible at the URL http://localhost/patGuestbook/admin/guestbook.php (remember to alter this as per the installation path on your system). Here’s what it looks like:
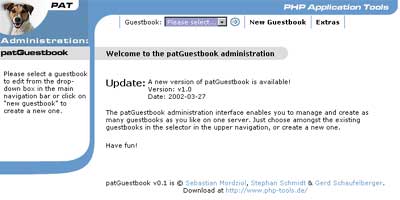
Again, a very simple interface. Use the “New Guestbook” command near the top of the page to create a new guestbook and define some basic parameters for it.
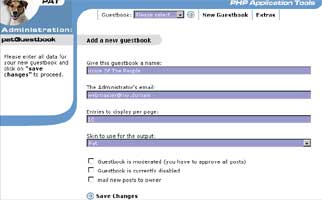
First, you need to specify a name for the guestbook - say, “Voice Of The People”. Next, you need to specify an email address to which entries should be delivered (if required), the number of entries to be shown to the user on each page, and the name of the template to be used for entry display. You also have some administrative parameters to deal with - email notification of new entries, moderation of guestbook entries and whether the guestbook should be active or inactive.
Use the “Save Changes” button to save your changes, and you’re done…or are you?
Playing The Field
Once you’ve create the guestbook, you need to configure the fields within it via the “Configure Fields” command. By default, all guestbooks can capture the following information from visitors: name, email address, URL, and comments.
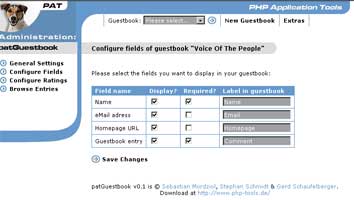
A configuration module allows you to control these fields, allowing you to decide, for example, which fields should be displayed to the user, which fields are required and which are optional, and the labels to display next to each field.
For the moment, you can leave the options in their default state, or change them if you like. When you’re done, use the “Save Changes” command to save your changes.
patGuestbook also offers you the ability to allow visitors to answer one or more multiple choice questions, a feature it calls “ratings”. Use the “Configure Ratings” command to view the ratings that are currently configured. Since this is a new guestbook, there are none at the moment; however, you can use the “Add a new rating possibility” command to add the question and possible answers to the system.
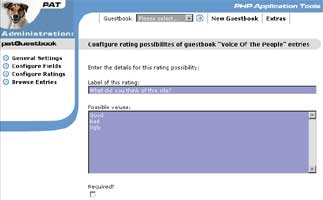
In case you haven’t figured it out yet, the rating label is the question that should be displayed to the user, with the list of available options specified, one on each line, in the large text box following it. You can also specify whether answering the question is mandatory or optional. When you’re done, use the “Save Changes” command to save your changes.
Code Poet
Now that the guestbook has been configured, all that’s left is to integrate it into your Web site. And even that’s a pretty simple task to accomplish - pop open the included sample PHP script, “example.php”, which lives in your source distribution’s root directory, and take a quick peek at what’s inside it (I’ve added comments to the code so that it’s easier to see what’s happening):
<?php

    // include required classes
    require_once("config/patGuestbook.php");
    require_once("include/patGuestbook.php");
    require_once("include/patTemplate.php");
    require_once("include/patDbc.php");

    // initialize template engine
    $template	=	new patTemplate;

    // set base directory to look for templates
    $template->setBasedir($skins_dir);

    // initialize DB abstraction layer
    $dbc		=	new	patMySqlDbc($db_host, $db_name, $db_user, $db_pass);

    // initialize guestbook
    $guestbook	=	new patGuestbook;

    // connect guestbook to template engine and DB connection
    $guestbook->setTemplate($template);
    $guestbook->setDbc($dbc);

    // set skin to use for guestbook
    if (!empty($skin)) {
        $guestbook->setSkin($skin);
    }

    // display guestbook
    $guestbook->process(array( "name" => "Voice Of The People" ));
?>
Nothing too complicated here. First, the script include()-s the files that contain the API functions required by patGuestbook.
// include required classes
require_once( "config/patGuestbook.php" );
require_once( "include/patGuestbook.php" );
require_once( "include/patTemplate.php" );
require_once( "include/patDbc.php" );
This is followed by initialization and creation of the patGuestbook object, which serves as the focal point for all future guestbook operations, together with the template engine and database connection point.
// initialize template engine
$template	=	new patTemplate;

// initialize DB abstraction layer
$dbc		=	new	patMySqlDbc( $db_host, $db_name, $db_user, $db_pass );

// initialize guestbook
$guestbook	=	new patGuestbook;

// connect guestbook to template engine and DB connection
$guestbook->setTemplate( $template );
$guestbook->setDbc( $dbc );
Once that’s done, the patGuestbook object’s process() method can be used to select and display the guestbook.
// display guestbook
$guestbook->process( array( "name" => "Voice Of The People" ) );
You can use the bare-bones skeleton above to create your own PHP scripts, or even integrate the lines of code above into your existing site. Either way, this is all you need to do to get a guestbook up and running. Painless, isn’t it?
User, User, On The Wall…
So that takes care of the geeky stuff that goes into the back-end of the system. Now, how about actually checking out what a user to your site would see when they launched the guestbook module?
In order to view the user experience for yourself, point your browser to the example script above, at http://localhost/patGuestbook/example.php, and you should see something like this:
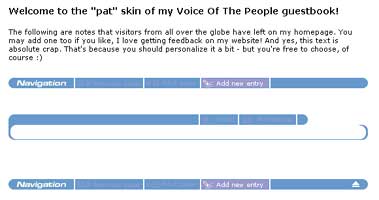
You can now use the “Add New Entry” command to enter a comment in the guestbook.
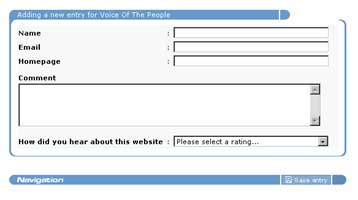
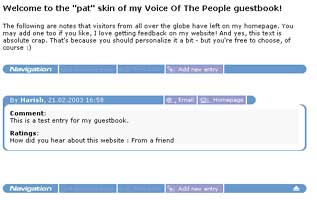
As you can see, the fields displayed correspond exactly to what you specified when configuring the guestbook (just to see if it all works as it should, try leaving out a required field when submitting your comment - patGuestbook should barf and display a whole string of errors). When you’re done, use the “Save Entry” button to save your comment, and the application will take you back to the main guestbook page, which should now display the comment you just entered.
You can now link to this script from other pages in your site, and start watching as the comments roll in!
That’s about it for the first part of this article. Of course, this isn’t all you can do with patGuestbook - in the second part of this article, I’ll show you how you can customize the look and feel of the default guestbook, together with instructions on how to moderate and deactivate individual entries. Make sure you come back for that!
Note: All examples have been tested on Linux/i586 with Apache 1.3.28, PHP 4.2 and patGuestbook 1.0. Examples are illustrative only, and are not meant for a production environment. Melonfire provides no warranties or support for the source code described in this article. YMMV!
This article was first published on 25 Feb 2003.