A Long Goodbye
Last time out, you learned about sequences, and how they could be processed with the <dtml-in> loop construct. You also learned about the special variables that DTML provides to developers to help them identify and take advantage of special sequence elements - the first element, the last element, odd and even elements and so on. Finally, you wrapped things up with a couple of simple applications based on sequences - a pager and a directory viewer.
In this final article in the series, I’m going to conclude this tour of DTML by introducing you to a couple of other members of the family - the <dtml-with> construct, which lets you manipulate the DTML namespace; the <dtml-let> construct, which lets you access variable values in different ways; and the <dtml-tree> construct, which provides a simple, widget-based interface to constructing tree structures in DTML.
With Or Without You
We’ll begin with something interesting. Create a DTML Document named “WithOrWithoutYou” and insert the following code.
<b>
The value of "id" is <dtml-var id><br>
The value of "icon" is <dtml-var icon><br>
The value of "me" is <dtml-var me>
</b>
Now, call this script with three parameters, like this:
http://localhost:8080/DTML%20Basics/WithOrWithoutYou?id=1234&icon=folder&me=John
In other words, I’m explicitly passing it values for the “id”, “icon” and “me” variables. But when I view the output of the script, I see something completely different:
The value of "id" is WithOrWithoutYou
The value of "icon" is misc_/OFSP/dtmldoc.gif
The value of "me" is John
Of the three values passed, only one appeared correctly. How come?
Take a look at the variable names used in the example. While the third one does not ring a bell, the first two are among the default properties associated with each and every Zope object.
Now, if you go back a little, you’ll remember a little thing called acquisition, a concept I took great pains to explain - basically, the process by which Zope tries to find a value for a variable. As I said before, Zope will first look for the variable value in the current folder and then traverse upwards to the root folder in search of it. If it is still unsuccessful, it looks in a couple of other places for the missing information; these places include cookies and form data sent using POST or GET methods.
Now, the entire gamut of objects and locations listed above represent a nebulous entity that Zope refers to as the “namespace”. By default, Zope places some default objects in this namespace when it starts up. Subsequent objects are added to this “stack” as and when they are invoked.
Consequently, when you load the DTML Document above, it is pushed to the top of the namespace stack along with its “id” and “icon” properties. When DTML tries to replace the value of the variables “id” and “icon” in the DTML Document, it encounters these two properties at the top of the namespace stack before even getting around to looking in the query string (which are always located at the bottom of the namespace stack). Which explains why the values passed on the query string never show up in the output of the script.
That said, since no value exists for the variable “me” in the namespace stack, Zope will finally get around to looking in the GET query string, locate the variable value and print it.
Obviously, this behaviour isn’t always what you want. Which is where the <dtml-with> tag comes in.
A Polite Request
Take a look at this next example, which demonstrates how the <dtml-with> tag can be used to work around the problems encountered in the previous example.
<b>
<dtml-with REQUEST only>
<dtml-if id>The value of "id" is <dtml-var id><br></dtml-if>
<dtml-if icon>The value of "icon" is <dtml-var icon><br></dtml-if>
<dtml-if me>The value of "me" is <dtml-var me><br></dtml-if>
</dtml-with>
</b>
Now, take a look at the output:
The value of "id" is 1234
The value of "icon" is folder
The value of "me" is John
How did this work? The <dtml-with> tag - it is used to push a object to the top of the DTML namespace. As a result, Zope will look for all the variables in this object first.
<dtml-with REQUEST only>
The above statement pushes the REQUEST object to the top of the namespace stack. This object consists of the CGI environment variables, cookies and form data sent using the GET and POST methods.
For a quick glimpse into this object, create a new DTML Document with the following code.
<dtml-var REQUEST>
And when you view the output of this script, you’ll see exactly what the REQUEST object contains.
The additional “only” attribute in the call to <dtml-with> tells Zope that it should not look beyond the REQUEST object for these values. Why bother with this extra tag? Consider what will happen if you don’t pass a value for the “id” parameter - once Zope checks the REQUEST object and fails to find a value for this variable, it will proceed down the namespace stack to see if a value exists anywhere else. And we know it does - which could lead to unexpected results. The “only” attribute is the only (pardon the pun) way to ensure that this does not happen.
<dtml-if id>The value of "id" is <dtml-var id><br></dtml-if>
<dtml-if icon>The value of "icon" is <dtml-var icon><br></dtml-if>
<dtml-if me>The value of "me" is <dtml-var me><br></dtml-if>
The rest of the code checks to see whether the named variable exists in the REQUEST object, and only displays the corresponding line of output if it does. Again, this is a good way to avoid the unexpected, and to prevent bugs creeping in.
Let Me In
You’ve just seen how to push existing objects to the top of the namespace. But what if you want to create a new DTML object or variable? How do you push that newly-minted variable in to the DTML namespace?
The <dtml-let> tag is designed for just this kind of thing. Here’s an example:
<dtml-let me="'John Doe'" >
I am <dtml-var me>.
</dtml-let>
The output of the script is pretty obvious:
I am John Doe
The <dtml-let> tag has been used to push a new variable, “me”, to the top of the namespace. You can now access the value for this variable without even passing it as part of the query string. This is an effective way of debugging complicated DTML methods which require numerous parameters in the form data; just push them on to the namespace using the <dtml-let> tag, test your code, and, once you’re done, delete the <dtml-let> tag!
You can also push objects on to the namespace. As an example, consider the process of pushing the GetUsers() ZSQL Method on to the namespace:
<dtml-let users=GetUsers>
<dtml-in users>
<dtml-var sequence-number>. <dtml-var Title> <dtml-var FirstName> <dtml-var Surname> - <dtml-var Email>
</dtml-in>
</dtml-let>
This example pushes the sequence returned by the GetUsers() ZSQL methods on to the namespace. The new “users” variable can then be processed as usual with the <dtml-in> tag.
Climbing A Tree
One of the most striking features of the Zope Management Interface is the navigation menu that appears on the left side. And the cool thing is, Zope comes with a built-in construct that allows you to replicate and use this tree structure for your own purposes. It’s called the <dtml-tree> tag - and here’s what it looks like:
<dtml-tree>

<dtml-var getId>

</dtml-tree>
This is a very simple implementation of the <dtml-tree> tag…as you can see from the output below:
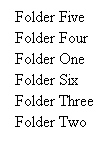
Here, the <dtml-tree> tag dynamically searches for the objects in the current folder and lists them by ID. It is obvious that, by default, it lists only the folders in the current location.
Now, let me make the example more interesting:
<dtml-tree branches_expr="objectValues()" sort=id>
   <dtml-var getId>
</dtml-tree>
Here’s the output:
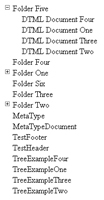
I now have a listing of all the objects in the current folder along with a neat little icon that allows downward traversal. Give it a shot and you’ll see that you can now see all the objects under the current folder.
<dtml-tree branches_expr="objectValues()" sort="id">
The additional “branch_expr” attribute of the <dtml-tree> tag is used to specify the expression that will be evaluated by Zope to display the listing of the objects in the tree. The “sort” attribute tells Zope to sort the list by ID.
Want to play around with the code shown above? Just add the “reverse” attribute:
<dtml-tree branches_expr="objectValues()" sort="id" reverse>

Here’s a brief list of the most useful <dtml-tree> attributes - try them at your leisure:
“header” - this allows you to specify a DTML document that will be displayed as a header for each expanded node.
“footer” - this is similar to the “header” attribute explained above, as it allows you to specify the footer for each expanded note.
“nowrap” - set this to true if you want to truncate the nodes if there isn’t enough space to expand them.
The Real Thing
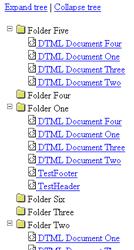
How about building on the basic tree in the previous example, and making it a little more useful? This next variant allows you to add links to the terminal nodes so that the user can view the object by clicking it.
<dtml-tree branches_expr="objectValues()" sort="id">

<dtml-if "meta_type=='Folder'">

<img src="<dtml-var icon>">
<dtml-var getId>

<dtml-else>

<img src="<dtml-var icon>">
<a href="<dtml-var tree-item-url>">
<dtml-var getId>
</a>

</dtml-if>

</dtml-tree>
Before I dissect this code, let’s take a quick peek at the output:
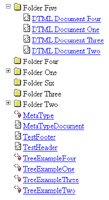
Let’s look at the code line-by-line to see how this happened.
<dtml-tree branches_expr="objectValues()" sort="id">
Nothing special here - I’ve used the objectValues() method to obtain a list of objects that are located in the current hierarchy, and the “sort” attribute to sort it by the object ID (in case all this is new to you, go back to the previous article in this series, refresh your memory and then continue reading).
I’ve also linked all the objects except the Folder objects, via the following “if-else” block:
<dtml-if "meta_type=='Folder'">

<img src="<dtml-var icon>">
<dtml-var getId>

<dtml-else>

<img src="<dtml-var icon>">
<a href="<dtml-var tree-item-url>">
<dtml-var getId>
</a>

</dtml-if>
The “meta-type” attribute specifies the type of object, and has been used as the decision variable for the “if-else” block in the code snippet above. This attribute can come in handy if you’re not sure which object you’re dealing with - try typing
I am a <dtml-var meta_type>.
into an empty DTML Document and viewing the output to see how it works.
<dtml-else>

<img src="<dtml-var icon>">
<a href="<dtml-var tree-item-url>">
<dtml-var getId>
</a>

</dtml-if>
The hyperlinks themselves are accomplished via the special “tree-item-url” variable, which stores the URL for the current object. You’re probably already familiar with the special “icon” variable, which stores the path to the corresponding object icon.
Apart from the “tree-item-url” variable, the <dtml-tree> construct also exposes a number of other interesting variables. These include the “tree-root-url” variable, which returns the absolute URL to the base of the tree; the “tree-level” variable, which specifies the depth of the current node; and the “tree-item-expanded” variable, which returns a Boolean value based on the state of the node (true if it has been expanded, false if it has been collapsed).
This last property can be easily included in the example above to indicate the folders which have been expanded. Take a look at the code:
<dtml-tree branches_expr="objectValues()" sort="id">

<dtml-if "meta_type=='Folder'">

<img src="<dtml-var icon>" >

<dtml-if tree-item-expanded>
<b><dtml-var getId></b>
<dtml-else>
<dtml-var getId>
</dtml-if>

<dtml-else>

<img src="<dtml-var icon>">
<a href="<dtml-var tree-item-url>">
<dtml-var getId>
</a>

</dtml-if>

</dtml-tree>
Here’s the output:
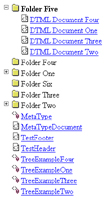
If you take a close look at the output, you will see that expanded folders are displayed in bold.
How about the ability to expand or collapse the entire tree? Add this bit of code to the example above:
<p>

<a href="<dtml-var URL0>?expand_all=1">Expand tree</a> |
<a href="<dtml-var URL0>?collapse_all=1">Collapse tree</a>

</p>
Call Of The Wild
DTML also offers a way to call other DTML methods from within your code, via the <dtml-call> construct. This comes in particularly handy when you want to invoke a method, but aren’t really all that concerned about displaying the results of that method to the user - SQL queries are a prime example of this.
Consider the following example, which demonstrates:
<dtml-var standard_html_header>

<dtml-call addMovieToCollection>

<h1>Movie <dtml-var name> has been added to your DVD collection!</h1>

<p><a href="listMovieCollection">List Movies in your Collection</a></p>

<p><a href="addMovieForm">Add Movies</a></p>

<dtml-var standard_html_footer>
In this case, I’ve called the addMovieToCollection() Z-SQL method. This method adds a record to the table containing my DVD collection. However, since I don’t really need to worry about the return value, I can use the <dtml-call> tag to invoke the Z-SQL method.
Note also that I am not explicitly passing any parameters to the Z-SQL method. In this scenario, Zope take cares of extracting the required data from the REQUEST namespace and passing the parameters to the invoked method automatically. Isn’t that neat?
There is a caveat, though - invoke the same method in an expression, and your workload increases. Why? Because now it’s up to you to pass the parameters to the method explicitly.
The Writing On The Wall
Now, every major programming language comes with the capability to include inline comments in the code. And DTML lets you include meaningful comments in your code via the <dtml-comment> tag. Take a look at the tree example, now rewritten with lots of comments.
<dtml-tree branches_expr="objectValues()" sort="id" single="1">

<dtml-comment> check if the current item in the tree is a folder</dtml-comment>

<dtml-if "meta_type=='Folder'">

<dtml-comment>If folder, just display the id</dtml-comment>

<img src="<dtml-var icon>" >

<dtml-comment>check if current item has been expanded</dtml-comment>

<dtml-if tree-item-expanded>
<dtml-comment> if expanded, display the id of the object in bold</dtml-comment>

<b><dtml-var getId></b>
<dtml-else>
<dtml-var getId>
</dtml-if>

<dtml-else>

<dtml-comment>if not folder, hyperlink the object so that it can be directly accessed by the user</dtml-comment>

<img src="<dtml-var icon>">
<a href="<dtml-var tree-item-url>">
<dtml-var getId>
</a>

</dtml-if>

</dtml-tree>
If you’re planning to make your code publicly available on the Internet, a comment is a great way to tell members of the opposite sex all about yourself - try including your phone number for optimum results.
Endzone
And that’s just about it. In this concluding article of a four-part series, I helped you dip your toes in the waters of more advanced DTML programming, demonstrating some of the more advanced tags available in the language. First, I showed you how to access elements in the namespace via the <dtml-with> construct, and how to add items to the namespace via <dtml-let>. Next, I demonstrated the <dtml-tree> widget, which provides a very unique take on the problem of constructing tree-based structures, and provided some insight into how the tree menu of the Zope management interface works by attempting to duplicate some of its functionality. Finally, I demonstrated how DTML allows you to call methods with <dtml-call>, and make your code more readable with <dtml-comment>.
Obviously, there’s more to DTML than what you’ve learned over the past couple of weeks in this tutorial. What I’ve taught you in this four-part series is just the basics - you now know enough to begin reading other people’s DTML code (and making sense of it), and also to begin futzing around with scripts of your own. Here are a few links to help you get started:
The Zope Book, at http://www.zope.org/Documentation/ZopeBook/
Learning Zope, at http://www.zope.org/Members/itamar/LearningZope/
DTML reference material, at http://www.zope.org/Documentation/ZopeBook/AppendixA.stx
Until next time…be good!
Note: All examples in this article have been tested on Linux/i586 with Zope 2.5.0. Examples are illustrative only, and are not meant for a production environment. Melonfire provides no warranties or support for the source code described in this article. YMMV!
This article was first published on 14 Jun 2002.