The Sound Of Music
Well, we’re almost at the end of this wild ride I like to call Flash 101. If you’ve been following along, you’re probably heaving a sigh of relief that this tutorial is almost over, and you can now get down to actually working with Flash 5.
Not so fast, though - I still have a few minutes left, and I intend to use them all. In this, the concluding article, I’m going to teach you how to jazz up your animation by adding sound clips, looping them, syncing them and fading them in and out. I’ll also show you how to attach sounds to your Flash buttons, and how to import images from other applications into Flash.
Don’t go anywhere!
The Wave
Just as you can create symbols and use them over and over again, Flash allows you to import sound files into the Library and use them at different places in your Flash movie. You can import sound files in WAV and MP3 format via the File -> Import command. Once you’ve imported a sound file into your Flash movie, it will show up in the Library.
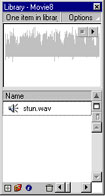
Adding a sound file to your Flash movie is simplicity itself - create a new layer, select the frame where you would like the sound to begin playing, and drag the sound file from the Library on to the Stage. A graphical representation of the waveform will appear in the Timeline.

Flash allows you to add as many sound files as you like to Flash movie; keep in mind, however, that all these sound files are mixed together when the final movie is played back. It’s also a good idea to place each sound file on a separate layer, so that you can easily manipulate the various files in a movie.
You can control attributes of the sound clip, or add effects to it via the Window -> Panels -> Sound panel. With the frame containing the sound clip selected, pop open this panel and take a look at the options available.
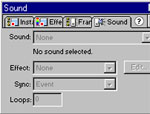
The most important of the various options available is the Sync option - it allows you to specify whether the sound file is synchronized with the rest of the animation or not. To synchronize the sound clip with the different frames of the animation, choose the Stream option. Streamed sounds begin playing while they are downloading, and automatically stop at the end of the movie.
If, instead, you’d prefer your sound clip to play throughout the movie independent of the animation, select the Event option. In this case, the sound clip plays independent of the frames in the Timeline, and may continue even after the movie ends. The Event option is most commonly used to link sounds to a Flash event, such as clicking a button.
If you’d like the sound clip to play more than once, you can enter a number into the Loop field, and you can also add sound effects like fades and channel shifts using the Effects drop-down menu.
Finally, you can stop the sound at a specific point by inserting a keyframe at that point in the sound layer, and selecting Stop from the Sync menu option for that keyframe.
Sound Bites
In case the pre-defined Flash sound effects aren’t quite enough, you can also use Flash’s built-in editing controls to further customize the sound clip. These editing controls are available via the Edit command in the Sound panel.
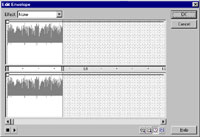
This looks complex, but it’s actually far simpler than it looks. For example, to change the points at which the sound clip starts and stops playing, you simply need to drag the Time In and Time Out controls (the vertical gray bars between the left and right channel waveforms) to the appropriate points. This comes in particularly handy if you have a long sound clip, and only need to use a specific portion of it in your animation clip.
You can also change the volume levels for each channel by dragging the “envelope handles” - the hollow boxes you see in each channel - up or down. The greater the height between the two boxes, the higher the volume level, and vice-versa. Flash allows you to create up to eight different pairs of envelope handles for each sound clip.
Boom!
In addition to playing back sound files as the movie runs, Flash also allows you to play sounds in response to user action. The most common example of this is attaching sound files to Flash buttons, so that a different sound plays depending on button state. Take a look at this example, which demonstrates how you can play a different clip for “hover” and “click” events.
How did I do this? Not too hard, actually - create a Flash button, and add a new layer to the Timeline while in symbol-editing mode. Then simply insert keyframes corresponding to the Up, Over and Down states on this new layer, and drag different sound files from the Library for each state.
For example, if you’d like a specific sound to play when the mouse pointer moves over the button, you could insert a new keyframe for the Over state, and drag a sound file on to the Stage for that keyframe.
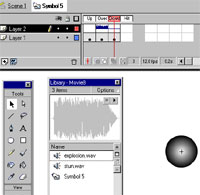
Make sure that you have Event selected for the Sync option on the Sound panel, and try it out.
You can add sound effects, and manipulate the sound clip with the editing control, here too.
Squeezing It All In
Flash typically exports all the sounds in a movie clip when you publish the movie. As the author of the movie, you have a fair amount of control over the export process, including the ability to set various compression options like sampling rate and quality.
All these options are available to you in the Sound Properties dialog box, which you can get to from the Properties shortcut menu that appears when you right-click the sound file in the Library. There are four compression options available: default (default settings), ADPCM, MP3 and raw (no compression). A test button allows you to preview the sound clip with your selected compression settings.
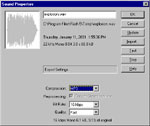
Some of the compression options allow you to specify bit rates and quality - remember that higher compression equals smaller files equals lower quality when experimenting with these settings.
Pretty Pictures From Elsewhere
In addition to importing sound clips, Flash also allows you to import images created in other applications and use them in your Flash movie. Flash 5 has support for Adobe Illustrator EPS files, AutoCAD DXF files, bitmaps, GIFs, JPEGs, PNG images, and its own SWF format - all of these can be imported into Flash via the File -> Import command. Imported images appear in the Library with the other symbols you’ve created.
Since bitmaps are typically quite large, they can substantially increase the file size of your Flash movie - and so, Flash allows you to convert imported bitmaps into more efficient vector graphics with the Modify -> Trace Bitmap command.
The Trace Bitmap command does exactly what the name suggests - it traces the bitmap image and colours to create an accurate rendering of it in vector format. Typically, the final vector image lacks the fidelity of the original, but is still acceptable for use on the Web.
Flash also allows you some degree of control over the trace process, by specifying attributes such as Color Threshold (whether or not to consider pixels with similar color values as the same) and Curve Fit (how smooth curves should be). You’ll have to experiment with different values until you find a setting that works for your specific bitmap.

Once the bitmap has been converted to a vector graphic, you can manipulate it in exactly the same way as you would other objects on the stage - convert it to a symbol, alter its colour and shape, scale it, rotate it, and skew it.
Flash also allows you to use imported bitmaps as a fill - to do this, use the Modify -> Break Apart command instead. This will break the bitmap apart into separate segments of colour. Next, select the Eyedropper tool, and you should see the broken-apart bitmap in the list of available fills. Select the fill, and then use the drawing and painting tools to draw and paint with that fill. The following example demonstrates filling an ellipse with a bitmap fill.

The Scenic Route
In the best traditions of Broadway, Flash allows you to divide a movie into “scenes”, independent sequences which are played back one after the other. Scenes comes in handy when you need to organize your Flash movie into different sections.
You can add a new Scene via the Window -> Panels -> Scene panel; this is also the place to go if you need to remove a scene from the movie, or alter the order in which the scenes are played out.
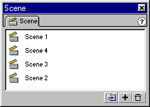
Flash also allows you to use ActionScript (specifically, the Go To action) to add interactivity to your movie by jumping to specific scenes in response to user input.
Finally, Flash also allows you to share the symbols you create in one Flash movie with other Flash movies, a capability referred to as “shared libraries”. In order to do this, you must mark the symbols you’d like to share by exporting them; you can do this from the Linkage menu command on the shortcut menu that appears when you right-click the symbol. Remember to include an identifier for the symbol as well.
Once all shared symbols have been exported in this manner, you can save your Flash movie – the shared library will be stored with it. You can now access the symbols within this Flash movie from any other movie via the File -> Open As Shared Library command. Once a shared library is opened, you can use symbols from it as you normally would, by dragging them on to the Stage.
Note, however, that shared libraries typically appear in a dull gray colour, indicating that you cannot modify the symbols contained within them.

When you publish a Flash movie containing symbols from a shared library, you must ensure that the shared library is also available to this movie. If Flash cannot find the shared library, the Flash movie will not play back correctly.
And that about covers it. Hopefully, you now know enough about Flash to begin using it for your own animation clips and Web effects. If you’d like to read more and perhaps learn a little bit more about ActionScript and advanced Flash techniques, write to me and I’ll see what I can do.
Till next time…stay healthy!
Note: All examples in this article have been tested on Macromedia Flash 5.0. Examples are illustrative only, and are not meant for a production environment. YMMV!
This article was first published on 25 Jan 2001.