Ahead Of The Game
One of the reasons I like PHP so much is its consistent support for new technologies. The language invites extensibility, making it easy for developers to add new modules to the core engine, and widespread community support has made PHP one of the most full-featured Web programming languages around, with support for a wide variety of modular extensions. Extensions available today allow developers to use PHP to perform IMAP and POP3 operations; dynamically constructs images and Shockwave Flash movies; perform credit card validation; encrypt sensitive data; and parse XML-encoded data.
This isn’t all, though. One of the more interesting items currently being bundled with PHP is the PDFLib extension, which allows developers to dynamically generate documents in Adobe Portable Document Format (PDF). Over the next few pages, I’m going to take a quick look at this module, providing you with a brief overview of its functions and demonstrating how you can use it in your PHP development. So come on it, and let’s get going!
Getting Started
In order to use PHP’s PDF manipulation capabilities, you need to have the PDFLib library installed on your system. If you’re working on Linux, you can download a copy from http://www.pdflib.com/pdflib/index.html and compile it for your box. If you’re running Windows, your job is even simpler - a pre-built PDF library is bundled with your distribution, and all you need to do is activate it by uncommenting the appropriate lines in your PHP configuration file.
Additionally, you’ll need a copy of the (free!) Adobe Acrobat PDF reader, so that you can view the documents created via the PDFLib library. You can download a copy of this reader from http://www.adobe.com/
Once you’ve got everything in place, it’s time to create a simple PDF file. Here goes:
<?php
// create handle for new PDF document
$pdf = pdf_new();

// open a file
pdf_open_file($pdf, "philosophy.pdf");

// start a new page (A4)
pdf_begin_page($pdf, 595, 842);

// get and use a font object
$arial = pdf_findfont($pdf, "Arial", "host", 1);
pdf_setfont($pdf, $arial, 10);

// print text
pdf_show_xy($pdf, "There are more things in heaven and earth, Horatio,", 50, 750);
pdf_show_xy($pdf, "than are dreamt of in your philosophy", 50, 730);

// end page
pdf_end_page($pdf);

// close and save file
pdf_close($pdf);
?>
Save this file, and then browse to it through your Web browser. PHP will execute the script, and a new PDF file will be created and stored in the location specified at the top of the script. Here’s what you’ll see when you open the file:

Anatomy Lesson
Let’s take a closer look at the code used in the example above.
Creating a PDF file in PHP involves four basic steps: creating a handle for the document; registering fonts and colours for the document; writing or drawing to the handle with various pre-defined functions; and saving the final document.
Let’s take the first step - creating a handle for the PDF document.
// create handle for new PDF document
$pdf = pdf_new();
This is accomplished via the pdf_new() function, which returns a handle to the document. This handle is then used in all subsequent operations involving the PDF document.
Next up, you need to give the PDF file a name - this is accomplished via the pdf_open_file() function, which requires the handle returned in the previous operation, together with a user-defined file name.
// open a file
pdf_open_file($pdf, "philosophy.pdf");
Once a document has been created, you can insert new pages in it with the pdf_begin_page() function,
// start a new page (A4)
pdf_begin_page($pdf, 595, 842);
and end pages with the - you guessed it! - pdf_end_page() function.
// end page
pdf_end_page($pdf);
Note that the pdf_begin_page() function requires two additional parameters, which represent the width and height of the page to be created in points (a point is 1/72 of an inch). In case math isn’t your strong suit, the PHP manual provides width and height measurements for most standard page sizes, including A4, the one used in the example above.
In between the calls to pdf_begin_page() and pdf_end_page() comes the code that actually writes something to the PDF document, be it text, images or geometric shapes. In this case, all I’m doing is writing a line of text to the document - so all I need to do is pick a font, and then use that font to write the text string I need to the document.
Selecting and registering a font is accomplished via the pdf_findfont() and pdf_setfont() functions. The pdf_findfont() function prepares a font for use within the document, and requires the name of the font, the encoding to be used, and a Boolean value indicating whether or not the font should be embedded in the PDF file; it returns a font object, which may be used via a call to pdf_setfont().
$arial = pdf_findfont($pdf, "Arial", "host", 1);
pdf_setfont($pdf, $arial, 10);
Once the font has been set, the pdf_show_xy() function can be used to write a text string to a particular position on the page.
// print text
pdf_show_xy($pdf, "There are more things in heaven and earth, Horatio,", 50, 750);
pdf_show_xy($pdf, "than are dreamt of in your philosophy", 50, 730);
As you can see, this function requires a handle to the PDF document, a reference to the font object to be used, the text string to be written (obviously!), and the X and Y coordinates of the position at which to begin writing the text. These coordinates are specified with respect to the origin (0,0), which is located at the bottom left corner of the document.
Once the text has been written, the page is closed via a call to pdf_end_page(). You can then add one or more extra pages, or - as I’ve done here - simply close the document via pdf_close(). This will save the document contents to the file specified in the initial call to pdf_open_file(), and destroy the document handle created.
Pretty As A Picture
Now, that was a very simple example - but PHP’s PDF extension allows you to do a lot more than just write text to a page. Since a picture is worth a thousand words, consider this next example, which demonstrates the process of adding an image to your newly-minted PDF document.
<?php
// create handle for new PDF document
$pdf = pdf_new();

// open a file
pdf_open_file($pdf, "philosophy.pdf");

// start a new page (A4)
pdf_begin_page($pdf, 595, 842);

// get and use a font object
$arial = pdf_findfont($pdf, "Arial", "host", 1);
pdf_setfont($pdf, $arial, 10);

// print text
pdf_show_xy($pdf, "There are more things in heaven and earth, Horatio,", 50, 750);
pdf_show_xy($pdf, "than are dreamt of in your philosophy", 50, 730);

// add an image under the text
$image = pdf_open_image_file($pdf, "jpeg", "shakespeare.jpg");
pdf_place_image($pdf, $image, 50, 650, 0.25);

// end page
pdf_end_page($pdf);

// close and save file
pdf_close($pdf);
?>
Here’s the PDF output:

Most of the magic here happens via the pdf_open_image_file() and pdf_place_image() functions. The first one accepts an image type - GIF, JPEG, TIFF or PNG - and file name as arguments, and returns an image handle, which may then be re-used multiple times in the document.
The image handle returned in the previous step can be used by the pdf_place_image() function, which actually takes care of positioning the image at a particular point on the page. The coordinates provided to this function (the second and third arguments) refer to the position of the lower left corner of the image, while the fourth argument specifies the scaling factor to use when displaying the image (a scaling factor of 1 will show the image at actual size, while a factor of 0.5 will reduce the image to half its size).
The Shortest Distance Between Two Points
Why stop there? PHP’s PDF extension comes with a whole bag of functions designed to let you draw lines, circles and other shapes in your PDF document. Consider the following example, which demonstrates the process of drawing a line.
<?php
// create handle for new PDF document
$pdf = pdf_new();

// open a file
pdf_open_file($pdf, "letterhead.pdf");

// start a new page (A4)
pdf_begin_page($pdf, 595, 842);

// get and use a font object
$arial = pdf_findfont($pdf, "Arial", "host", 1);
pdf_setfont($pdf, $arial, 12);

// set a colour for the line
pdf_setcolor($pdf, "stroke", "rgb", 0, 0, 0);

// place a logo in the top left corner
$image = pdf_open_image_file($pdf, "jpeg", "logo.jpg");
pdf_place_image($pdf, $image, 50, 785, 0.5);

// draw a line under the logo
pdf_moveto($pdf, 20, 780);
pdf_lineto($pdf, 575, 780);
pdf_stroke($pdf);

// draw another line near the bottom of the page
pdf_moveto($pdf, 20, 50);
pdf_lineto($pdf, 575, 50);
pdf_stroke($pdf);

// and write some text under it
pdf_show_xy($pdf, "Confidential and proprietary", 200, 35);

// end page
pdf_end_page($pdf);

// close and save file
pdf_close($pdf);
?>
Here’s what you should see in the PDF document

In this case, the process of drawing a line involves creative use of the pdf_moveto(), pdf_lineto() and pdf_stroke() functions.
In the example above, I’d like to draw a line from the position (20,780) to the new position (575, 780). In order to do this, I first need to place the cursor at the starting point (20,780), via a call to pdf_moveto().
pdf_moveto($pdf, 20, 780);
Next, I need to set the end point of the line, via pdf_lineto():
pdf_lineto($pdf, 575, 780);
Finally, the line is actually rendered using pdf_stroke().
pdf_stroke($pdf);
The stroke colour is set via a call to pdf_setcolor(), which accepts a number of parameters: the PDF document handle, whether the colour being set is for “stroke”, “fill” or “both”, the colour scheme to use (RGB or CMYK), and a list of colour values appropriate to the selected colour scheme.
pdf_setcolor($pdf, "stroke", "rgb", 0, 0, 0);
It’s important to note that the list of colour values provided to pdf_setcolor() must be specified in terms of percentage intensity - that is, the intensity of that colour, expressed as a percentage of the maximum intensity possible. So, if I wanted to set red (RGB: 255,0,0) as the stroke colour, my call to pdf_setcolor() would look like this,
pdf_setcolor($pdf, "stroke", "rgb", 1, 0, 0);
while a fill colour of yellow (RGB: 255,255,0) would be
pdf_setcolor($pdf, "fill", "rgb", 1, 1, 0);
Square Peg, Round Hole
Lines aren’t the only thing you can draw - circles and rectangles also figure prominently on the menu. Take a look at the following example, which demonstrates.
<?php
// create handle for new PDF document
$pdf = pdf_new();

// open a file
pdf_open_file($pdf, "shapes.pdf");

// start a new page (A4)
pdf_begin_page($pdf, 595, 842);

// set a fill colour
pdf_setcolor($pdf, "fill", "rgb", 1, 1, 0);

// set a stroke colour
pdf_setcolor($pdf, "stroke", "rgb", 0, 0, 0);

// draw a rectangle
pdf_rect($pdf, 50, 500, 200, 300);
pdf_fill_stroke($pdf);

// set a fill colour
pdf_setcolor($pdf, "fill", "rgb", 0, 1, 0);

// set a stroke colour
pdf_setcolor($pdf, "stroke", "rgb", 0, 0, 1);

// draw a circle
pdf_circle($pdf, 400, 600, 100);
pdf_fill_stroke($pdf);

// end page
pdf_end_page($pdf);

// close and save file
pdf_close($pdf);
?>
Here’s the output:

In this case, the pdf_rect() function has been used to draw a rectangle, given the coordinates of the lower left corner and the height and width. This rectangle has then been filled and outlined in two different colours, via the pdf_fill_stroke() function.
pdf_setcolor($pdf, "fill", "rgb", 1, 1, 0);

pdf_setcolor($pdf, "stroke", "rgb", 0, 0, 0);

pdf_rect($pdf, 50, 500, 200, 300);

pdf_fill_stroke($pdf);
Circles are handled by the pdf_circle() function, which accepts three arguments: the X and Y coordinates of the circle center, and the length of the circle radius.
pdf_circle($pdf, 400, 600, 100);
This ability to draw geometric shapes on the fly can come in handy in a number of different situations. Consider the following one, in which a couple of “for” loops have been combined with the pdf_lineto() function to generate a PDF line grid.
<?php
// create handle for new PDF document
$pdf = pdf_new();

// open a file
pdf_open_file($pdf, "grid.pdf");

// start a new page (A4)
pdf_begin_page($pdf, 595, 842);

// set a stroke colour
pdf_setcolor($pdf, "stroke", "rgb", 0, 0, 0);

// draw vertical lines (move along X axis)
for ($x=0; $x<=595; $x+=20) {
    pdf_moveto($pdf, $x, 0);
    pdf_lineto($pdf, $x, 842);
    pdf_stroke($pdf);
}

// draw horizontal lines (move along Y axis)
for ($y=0; $y<=842; $y+=20) {
    pdf_moveto($pdf, 0, $y);
    pdf_lineto($pdf, 595, $y);
    pdf_stroke($pdf);
}

// end page
pdf_end_page($pdf);

// close and save file
pdf_close($pdf);
?>
Here’s the output:

Heaven Is A Place On Earth
You can set document information with the pdf_set_info_*() family of functions; this information identifies the document creator, title and content. The following example demonstrates:
<?php
// create handle for new PDF document
$pdf = pdf_new();

// open a file
pdf_open_file($pdf, "philosophy.pdf");

// start a new page (A4)
pdf_begin_page($pdf, 595, 842);

// set document information
pdf_set_info_author($pdf, "William Shakespeare");
pdf_set_info_creator($pdf, "William Shakespeare");
pdf_set_info_title($pdf, "Hamlet");
pdf_set_info_subject($pdf, "Act I Scene 5");
pdf_set_info_keywords($pdf, "Horatio Hamlet philosophy");

// get and use a font object
$arial = pdf_findfont($pdf, "Arial", "host", 1);
pdf_setfont($pdf, $arial, 10);

// print text
pdf_show_xy($pdf, "There are more things in heaven and earth, Horatio,", 50, 750);
pdf_show_xy($pdf, "than are dreamt of in your philosophy", 50, 730);

// end page
pdf_end_page($pdf);

// close and save file
pdf_close($pdf);
?>
And now, when you view the dynamically-generated PDF file in Acrobat Reader, you’ll see this information in the Document Properties window.
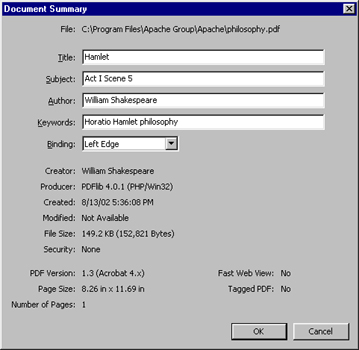
Piece Of Pie
Now that you’ve got a good understanding of just how to go about creating PDF files, it’s time to see a real-life application. The following example demonstrates how PHP can accept numeric data and turn it into a graph - specifically, a multi-coloured pie chart.
The form below asks for a series of data “slices”, in the form of numeric data, separated by commas. Once you’ve entered a few numbers, the “pie.php” script converts them from absolute numbers into data chunks of different relative sizes, and uses these chunks to create a PDF document containing a pie chart, marking out the different pie slices and filling them with different colours.
<html>
<head>
<basefont face=arial>
</head>

<body>
<h3>Pie Chart Generator</h3>
<table cellspacing="5" cellpadding="5">
<form action="pie.php" method=POST>
<tr>
<td>Enter numeric values (pie segments), separated by commas</td>
</tr>
<tr>
<td><input type=text name=data></td>
</tr>
<tr>
<td><input name="submit" type=submit value="Generate PDF Pie Chart"></td>
</tr>
</form>
</table>

</body>
</html>
Here’s the script that does all the work:
<?php
// raw data
$data = $_POST['data'];
$slices = explode(",", $data);

// initialize some variables
$sum = 0;
$degrees = array();
$diameter = 200;
$radius = $diameter/2;

// set up colours array for pie slices (rgb, as percentages of intensity)
// add more to these if you like
$colours = array(
    array(0,0,0),
    array(0,0,1),
    array(0,1,0),
    array(1,0,0),
    array(0,1,1),
    array(1,1,0),
    array(1,0,1),
);

// calculate sum of slices
$sum = array_sum($slices);

// convert each slice into corresponding percentage of 360-degree circle
for ($y=0; $y<sizeof($slices); $y++) {
    $degrees[$y] = ($slices[$y]/$sum) * 360;
}

// start building the PDF document
// create handle for new PDF document
$pdf = pdf_new();

// open a file
pdf_open_file($pdf, "chart.pdf");

// start a new page (A4)
pdf_begin_page($pdf, 500, 500);

// set a stroke colour
pdf_setcolor($pdf, "stroke", "rgb", 1, 1, 0);

// draw baseline
pdf_moveto($pdf, 250, 250);
pdf_lineto($pdf, 350, 250);
pdf_stroke($pdf);

for ($z=0; $z<sizeof($slices); $z++) {
    // set a fill colour
    pdf_setcolor($pdf, "fill", "rgb", $colours[$z][0], $colours[$z][1], $colours[$z][2]);

    // calculate coordinate of end-point of each arc by obtaining
    // length of segment and adding radius
    // remember that cos() and sin() return value in radians
    // and have to be converted back to degrees!
    $end_x = round(250 + ($radius * cos($last_angle*pi()/180)));
    $end_y = round(250 + ($radius * sin($last_angle*pi()/180)));

    // demarcate slice with line
    pdf_moveto($pdf, 250, 250);
    pdf_lineto($pdf, $end_x, $end_y);

    // calculate and draw arc corresponding to each slice
    pdf_arc($pdf, 250, 250, $radius, $last_angle, ($last_angle+$degrees[$z]));

    // store last angle
    $last_angle = $last_angle+$degrees[$z];

    // fill slice with colour
    pdf_fill_stroke($pdf);
}

// redraw the circle outline
pdf_circle($pdf, 250, 250, 100);
pdf_stroke($pdf);

// end page
pdf_end_page($pdf);

// close and save file
pdf_close($pdf);

?>
The data entered into the form is passed to the “pie.php” script via a variable named $data; this data is then split into its individual components with the explode() function, and each individual value is placed in the $slices array. A loop then converts these numbers into degrees of a circle, and draws arcs for each slice. In each iteration of the loop, the coordinate of the end point of the arc is also calculated and a line segment in drawn to demarcate the arc from the rest of the circle. Once the pie segment has been drawn, the pdf_fill_stroke() function is used to fill it with colour; this colour is obtained from the $colours array.
I’m not going to go into the details of how the script calculates the length of each arc and line segment - the script includes commented code fragments, which should explain most of the details.
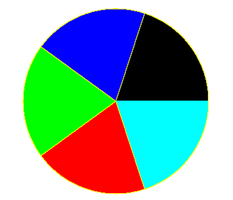
If you enter five data slices of equal value, your pie chart will look like this,
Whereas if you enter two slices of equal value, it will look like this:
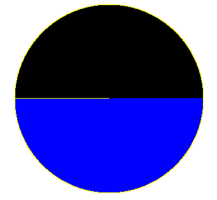
Go on - play with it and see how the various slices change in shape to reflect the relative sizes of your data chunks. And while you’re enjoying yourself, I’ll bid you adieu…till next time!
Note: All examples in this article have been tested on Linux/i586 with Apache 1.3.12 and PHP 4.2.0. Examples are illustrative only, and are not meant for a production environment. Melonfire provides no warranties or support for the source code described in this article. YMMV!
This article was first published on 13 Aug 2002.