The Write Stuff
There are two things that developers hate.
Fixing bugs. And writing documentation.
Now, while the first can be handled through better planning and execution, it’s the second one that really gets a developer’s goat. Most developers can’t stand the thought of documenting their own code, finding it both tedious and a waste of their time and skills (although, strangely enough, they’re the first to complain about the “lack of documentation” when it comes to someone else’s code.)
The fact of the matter, though, is that you’re fooling yourself if you think that you can survive without documentation. Properly-documented application code makes it easier to trace and squash bugs, to maintain code over the long run, and to improve both the productivity of the programmer and the quality of the software. You can’t avoid it, and so you’re just going to have to grow up and learn to live with it.
And that’s where this article comes in. Over the next few pages, I’m going to introduce you to PHPDoc, a documentation system for PHP that relies on comments within your code to automatically generate documentation for your PHP classes. As you will see, using PHPDoc can simplify the task of creating API documentation and thereby save you a significant amount of time in the post-release phase of a software project.
Speaking In Tongues
PHPDoc is based on Javadoc, the trailblazing documentation standard for Java application code. Javadoc began as in-house effort at Sun Microsystems to ensure consistency in code documentation; it rapidly turned into an unofficial standard used by millions of Java programmers worldwide.
According the Javadoc site (http://java.sun.com/j2se/javadoc/), “…the Javadoc tool parses the declarations and documentation comments in a set of Java source files and produces a corresponding set of HTML pages describing (by default) the public and protected classes, nested classes (but not anonymous inner classes), interfaces, constructors, methods, and fields…”
Ouch! Why can’t these guys speak plain English?!
Let me translate: Javadoc is a tool that reads and parses the comments within the source code of a Java package, and automatically converts these comments into human-readable API documentation. Obviously, the process is not completely automatic - the developer still needs to follow some basic rules while creating the comments - but using Javadoc to generate API documentation is still faster than doing it manually.
PHPDoc is similar to Javadoc. It, too, uses comments (in the same style employed by Javadoc) placed within a class’ source code to automatically and transparently create API documentation that can be delivered to a customer together with the source code. It doesn’t do everything Javadoc can do, primarily because PHP is a far simpler language than Java and the additional complexity is not really necessary; however, as you will see, it packs more than enough power for most purposes.
Before I get into the nitty-gritty of using PHPDoc, I’m going to quickly review the basics of the comment style used, so that you have a better understanding of the concept and how it works. Flip the page, and let’s get started.
A Quick Snack
PHPDoc requires that the comments placed by a developer within his or her source code conform to a particular format. Assuming this format, PHPDoc can parse these comments and use them to create an API document.
In order to demonstrate this, let’s consider the following simple PHP class, which claims to automatically make a sandwich for you. This class has been marked up with PHPDoc-compatible comments.
<?php

/**
 * Automatically creates a sandwich customized to your preferences
 *
 * @author Melonfire <[email protected]>
 * @version 2.0
 * @since 1.3
 * @access public
 * @copyright Melonfire
 *
 */

class SandwichMaker
{
	/**
	 * Bread type
	 *
	 * @var integer
	 * @access public
	 * @see setType()
	 */
	var $type;

	/**
	 * Sandwich filling
	 *
	 * @var array
	 * @access public
	 * @see setFillings()
	 */
	var $fillings = array();


	/**
	 * Creates a sandwich with specified bread type and filling
	 *
	 * @return Boolean
	 * @access public
	 */
	function makeSandwich()
	{
		// snip
	}

	/**
	 * Sets bread type for sandwich
	 *
	 * @param integer $type  bread type
	 * @return Boolean
	 * @access public
	 * @see makeSandwich()
	 * @see setFillings()
	 */
	function setType($type)
	{
		// snip
	}

	/**
	 * Sets filling for sandwich
	 *
	 * @param array $fillings list of fillings
	 * @return Boolean
	 * @access public
	 * @see makeSandwich()
	 * @since 1.2
	 */
	function setFillings($fillings)
	{
		// snip
	}

}
?>
There are some fundamental rules you should be aware of when creating these comment blocks:
-
Every comment block must begin with a forward slash (/) followed by two asterisks (**).
-
Subsequent lines begin with an asterisk (*), which is indented to appear under the first asterisk of the opening line.
-
The end of the block is defined by an asterisk (*), followed by a forward slash (/).
Such comment blocks are usually present at both package and module level in Java. Since PHP does not group objects in this way, you don’t usually have to worry about these (although you can, if your code is organized according to this convention).
Once you’ve got the initial comment block set up, PHPDoc lets you add some information to it. This information consists of a single-line description of the item, together with zero or more tags containing further information. The description and tags are separated by a single line containing a single asterisk (*).
Each Javadoc “tag” consists of the @symbol, a keyword and a value. For example, the tag
@author Melonfire <[email protected]>
when used in a class context, indicates that the class was created by Melonfire, while the tag
@version 2.0
indicates that the class is currently at version 2.0
There are three types of comment blocks you may use here:
-
Class comment block: This comment block provides a general overview of the class, its purpose, its authors and its version number. It typically appears right at the top of the class definition.
-
Variable comment block: This comment block is used to document class variables or properties; it provides information on the variable type, its raison d’etre, and references to other class variables that it is related to.
-
Method comment block: This comment block documents class methods, providing detailed information on method arguments, return values and public/private access.
Let’s look at each of these in detail.
Drilling Deeper
As you can see from the example on the previous page, a general overview of the class is provided in the comment block preceding the class definition.
<?php
/**
 * Automatically creates a sandwich customized to your preferences
 *
 * @author Melonfire <[email protected]>
 * @version 2.0
 * @since 1.3
 * @access public
 * @copyright Melonfire
 *
 */

class SandwichMaker()
{
	// snip
}
?>
The first line within the comment block provides a brief, human-readable description of the class. It is followed by a blank line, and a series of tags.
Each of the tags in the comment block above provides information on some aspect of the class. Here’s a brief list of what they represent:
@author - the name of the class author
@version - the current version number of the class
@since - historical information on the availability of this class
@access - whether this class is a private or public class
@copyright - the name of the copyright holder of the class
Most of these tags are optional; PHPDoc will either use default values if they are not present, or simply ignore their absence.
If a class has multiple authors, you may list them using multiple @author tags - remember to group them together so that the parser has no difficulty finding all of them.
If you would like to group your classes together, you can also use the
@package package-name
tag as a grouping key; PHPDoc will then use the package name to group all related classes together when creating the documentation.
Moving on, once the class has been documented, the next step is to document the class variables. Here’s an example:
<?php
/**
 * Bread type
 *
 * @var integer
 * @access public
 * @see setType()
 */

var $type;
?>
In addition to the tags described above, class variables can have two additional tags, both of which are fairly self-explanatory:
@var - the variable type
@see - references to other, related variables and methods
Finally, all that’s left is to document the class methods. Here’s a quick example,
<?php
/**
 * Sets bread type for sandwich
 *
 * @param integer $type  bread type
 * @return Boolean
 * @access public
 * @see makeSandwich()
 * @see setFillings()
 */

function setType($type)
{
// snip
}
?>
Class methods can use two additional tags, in addition to the ones previously described:
@return - a description of the return value from the method
@param - a description of the argument passed to the method, in the form
@param arg-type arg-name arg-description
Obviously, you should include as many @param tags as there are arguments to be passed to the method, and you should make it a point to list them in the order in which the method expects them.
It should be noted that the @see tag is particularly useful when it comes to documenting class methods - it provides an easy way to create connections between related methods. PHPDoc will automatically hyperlink the methods named in the @see tag to each other when it creates the documentation.
I, Robot
With the comment style out of the way, it’s time to actually run PHPDoc on the source code and use the comments within it to create some API documentation.
Obviously, the first step here is to make sure that you have a copy of the application. In case you don’t, drop by the official Web site at http://www.phpdoc.de/, and download a copy (this article uses version 1.0b). Unzip the files within the source archive to a directory off your Web server root, and you’re ready to go (in case you have difficulty, take a look at the README that’s included in the source archive).
In order to have PHPDoc create documentation for your classes, you need to write a simple PHP script that instantiates an object of the PHPDoc class and uses it to write HTML files containing the API documentation. This script is fairly standard, and one version of it ships with the PHPDoc source archive. Here’s what it looks like:
<html>
<head>
</head>

<body>

<?php
// where are the PHPDoc files?
// alter this as per your setup
define("PHPDOC_INCLUDE_DIR", "/usr/local/apache/htdocs/phpdoc/");

// system linebreak sequence
// alter this as per your setup
define("PHPDOC_LINEBREAK", "\r\n");

// include PHPDoc files
include("prepend.php");

// instantiate a PHPDoc object
$doc = new Phpdoc;

// set application name
$doc->setApplication("SandwichMaker");

// source file location
// alter this as per your setup
$doc->setSourceDirectory("/usr/local/apache/htdocs/phpdoc/SandwichMaker/");

// destination directory for generated docs
// alter this as per your setup
$doc->setTarget("/usr/local/apache/htdocs/phpdoc/SandwichMaker/docs/");

// template location
// alter this as per your setup
$doc->setTemplateDirectory("/usr/local/apache/htdocs/phpdoc/renderer/html/templates/");

// source file suffixes
$doc->setSourceFileSuffix( array ("php", "inc") );

// parse
$doc->parse();

// and render
$doc->render();
?>

</body>
</html>
As you can see, the process of generating documentation with PHPDoc is fairly simple. Most of the work consist of setting file locations (for the source class and resulting output) via calls to the class methods setSourceDirectory(), setTarget() and setTemplateDirectory(). Once all these locations have been defined, the parse() method is used to scan your source code and generate XML data from the comments within it, while the render() method is used to convert and write this data to browseable HTML documents.
Note that your Web server must appropriate permissions to create files in the specified target directory.
Now, when you browse to this script via your Web browser, you should see something like this:
Parser starts... ... preparse to find modulegroups and classtrees. ... parsing classes. ... parsing modules. ... writing packagelist. Parser finished. Starting to render...
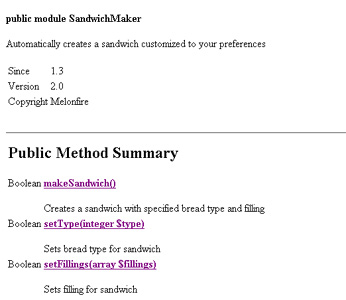
Once the script has finished executing (the process takes about thirty seconds for a medium-sized class file), take a look in the destination directory specified via the call to setTarget() in the PHP script above. You should see a whole bunch of XML and HTML files, which contain the API documentation created by PHPDoc. Here’s what they look like:
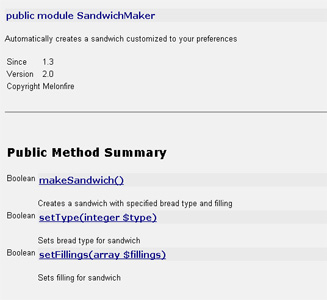
If this seems a little too plain-Jane for you, take a look at the <PHPDoc>/apidoc/keep/ directory - you’ll find a CSS file there that you can use to make the output documentation look a little nicer (you can customize this CSS file to meet your own particular requirements as well). Here’s what the documentation looks like after applying the CSS file:
Tonight’s Menu
Now, what you saw on the previous page was just an example. Let’s apply PHPDoc to an actual PHP class, one created by me a while back and pulled out of our archives for just this purpose, and see what happens.
<?php

/**
 * A Menu object which exposes certain generic methods.
 *
 * These methods will have nothing to do with  the visual presentation of
 * the menu tree; rather, they provide a simple API to various menu
 * relationships, and can be used by client- or server-side scripts
 * which are more closely connected to the presentation layer.
 *
 * @author Melonfire <[email protected]>
 * @version 1.0
 * @since 1.0
 * @access public
 * @copyright Melonfire
 */
class Menu
{

 /**
  * The hostname of the server hosting the database.
  *
  * @var string
  * @access public
  * @since 1.0
  * @see set_database_parameters()
  */
 var $hostname;

 /**
  * The username required for logging in to the database server.
  *
  * @var string
  * @access public
  * @since 1.0
  * @see set_database_parameters()
  */
 var $user;

 /**
  * The password required for logging in to the database server.
  *
  * @var string
  * @access public
  * @since 1.0
  * @see set_database_parameters()
  */
 var $password;

 /**
  * The name of the database containing the required tables.
  *
  * @var string
  * @access public
  * @since 1.0
  * @see set_database_parameters()
  */
 var $db;

 /**
  * The name of the table containing the menu information.
  *
  * @var string
  * @access public
  * @since 1.0
  * @see set_database_parameters()
  */
 var $table;

 /**
  * The constructor for the Menu class sets some default values for the database parameters
  *
  * @access public
  * @since 1.0
  *
  */
  function Menu()
  {
     $this->set_database_parameters("localhost", "me", "bs49h5634", "apps","menu");
  }


 /**
  * This function is used to set the database parameters as specified by the user.
  *
  * @param string $hostname The host name of the database server
  * @param string $user The username for accessing the database server
  * @param string $password The password for accessing the database server
  * @param string $db The name of the database to be accessed
  * @param string $table The name of the table that stores the menu
  * @access public
  * @since 1.0
  * @see query()
  *
  */
 function set_database_parameters($hostname, $user, $password, $db, $table)
 {
    $this->hostname = $hostname;
    $this->user = $user;
    $this->password = $password;
    $this->db = $db;
    $this->table = $table;
 }

 /**
  * This is a generic function to execute a query that is passed as a parameter
  *
  * @param string $query  The query to be executed
  * @return mixed $ret
  * @access public
  * @since 1.0
  *
  */
 function query($query)
 {
    // connect
    $connection = mysql_connect($this->hostname, $this->user, $this->password) or die ("Cannot connect to database");

    // run query
    $ret = mysql_db_query($this->db, $query, $connection) or die ("Error in query: $query");

    // return result identifier
    return $ret;
 }

 /**
  * This function returns the id of the parent of a node
  *
  * @param int $id The id of the node who parent has to be returned by function
  * @return int $id
  * @access public
  * @since 1.0
  *
  */
 function get_parent($id)
 {
    $query = "SELECT parent FROM $this->table WHERE id = '$id'";
    $result = $this->query($query);
    $row = mysql_fetch_row($result);
    return $row[0];
 }

}

?>
Here’s the PHP script which hooks this class file up to PHPDoc and actually generates some documentation:
<html>
<head>
</head>

<body>
<?php
// where are the PHPDoc files?
// alter this as per your setup
define("PHPDOC_INCLUDE_DIR", "/usr/local/apache/htdocs/phpdoc/");

// system linebreak sequence
// alter this as per your setup
define("PHPDOC_LINEBREAK", "\r\n");

// include PHPDoc files
include("prepend.php");

// instantiate a PHPDoc object
$doc = new Phpdoc;

// set application name
$doc->setApplication("Menu");

// source file location
// alter this as per your setup
$doc->setSourceDirectory("/usr/local/apache/htdocs/phpdoc/Menu/");

// destination directory for generated docs
// alter this as per your setup
$doc->setTarget("/usr/local/apache/htdocs/phpdoc/Menu/docs/");

// template location
// alter this as per your setup
$doc->setTemplateDirectory("/usr/local/apache/htdocs/phpdoc/renderer/html/templates/");

// source file suffixes
$doc->setSourceFileSuffix( array ("php", "inc") );

// parse
$doc->parse();

// and render
$doc->render();
?>
</body>
</html>
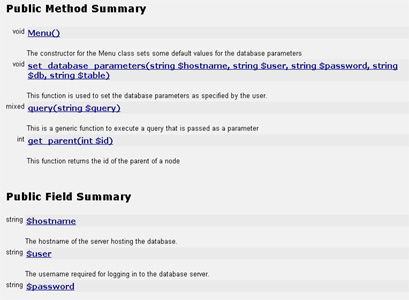
And here’s what it all looks like:
Different Strokes
Now, while PHPDoc is a fairly cool little utility, it does come with some caveats. For one, the software is still in beta, and the author specifically notes that it may not work as advertised in all cases. Further, since the package is still under development, it’s quite possible that there may be changes in future versions which are not backward-compatible. And finally, the program encounters difficulties if you include more than one class per PHP file.
If none of these things bothers you much, you should go ahead and begin using it. If, on the other hand, you’re looking for alternatives, take a look at eZ phpdoc, a Perl-based auto-documentation utility created by the nice guys at eZ Systems (http://developer.ez.no).
I’m not going to get into the details of eZ phpdoc’s syntax - there’s a very good tutorial written by the author on that very topic at http://publish.ez.no/article/articleprint/29/ - but I will demonstrate a small example. Take a look:
<?php

//!! SandwichMaker
//! This class claims to make a sandwich for you automatically
/*!
  One of the coolest inventions on the planet. class.Sandwichmaker allows you to specify your bread and filling, and then makes a plate of sandwiches matching your request. Ain't PHP cool?
*/

class SandwichMaker
{
	/// bread type
	var $type;

	/// sandwich filling
	var $fillings = array();


	/*!
	This function creates a sandwich with specified bread type and filling
	*/
	function makeSandwich()
	{
		// snip
	}

	/*!
	This function sets bread type for sandwich
	*/
	function setType($type)
	{
		// snip
	}

	/*!
	This function sets filling for sandwich
	*/
	function setFillings($fillings)
	{
		// snip
	}

}

?>
As you can see, the syntax used by eZ phpdoc is different from that used by PHPDoc. Some users seem to find it easier; personally, though, I prefer the PHPDoc way of doing things. You should try both to see which one you’re more comfortable with.
Once you’ve got your code all commented, you can use the eZ phpdoc Perl script to generate some documentation for it.
$ ./ezphpdoc-1.0.pl /usr/local/apache/htdocs/classes/ -o /tmp/docs/
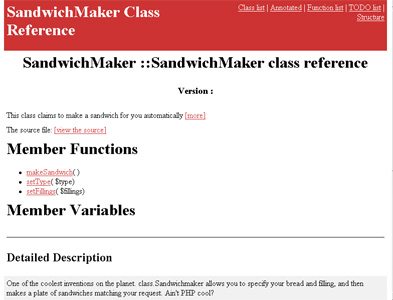
Here’s what it looks like:
Note that eZ phpdoc can currently output documentation in HTML, LaTeX and Unix manual formats.
Closing Time
And that’s about it from me. As you can see, tools such as the ones discussed in this article can substantially reduce the time you spend documenting your code…so long as you remember to comment your code correctly. If you can manage that - and you should be able to - then say goodbye to those long hours writing API documentation, and say hello to the brave new world of PHPDoc and its brethren.
In case you’re interested in learning more about the technologies discussed in this article, consider visiting the following links:
The JavaDoc Web site, at http://java.sun.com/j2se/javadoc/
The PHPDoc Web site, at http://www.phpdoc.de/
The eZ phpdoc Web site, at http://developer.ez.no/
The eZ phpdoc tutorial, at http://publish.ez.no/article/articleprint/29/
Till next time…be good!
Note: All examples in this article have been tested on Linux/i586 with PHPDoc 1.0b, Apache 1.3.20 and PHP 5. Examples are illustrative only, and are not meant for a production environment. Melonfire provides no warranties or support for the source code described in this article. YMMV!
This article was first published on 29 Mar 2002.